۱۳۹۹ خرداد ۲۳, جمعه

Deepin Or UbuntuDDE

I'm sure nowadays many Deepin users are thinking in changing to UbuntuDDE, so let's explain some differences between both Linux distros.


1. Community

At least in the main telegram channel Deepin has more than 2.000 users, but UbuntuDDE is new in beta version and have about 500 users.

    2. Boot

Despite de booting sound is the same in both distros, Deepin's animation is nicer than ubuntu's which uses a too bright background.


    3. Default memory and CPU usage

The CPU usage is similar, but Deepin by default is using more processes, more network connections and more drivers than UbuntuDDE.


  4.  Workspaces

UbuntuDDE allows up to 7 workspaces meanwhile Deepin right now only allows 4.
Is not only more workspaces for UbuntuDDE, it's also the more eficient way to display them.


    5.  Software Versions

Deepin is based on Debian so the program versions on store and apt are old but stable, and can have problems with the old libraries installed on the system when compiling new software.

We can see below that Ubuntu's compiler version is quite new, the 9.3.0 which is quite well, but Deepin's version is 6.3.0.


Regarding the kernels, UbuntuDDE has the 5.4.0.21 and Deepin the 4.15.0-30, the libc in both systems is updated.


    6.  The store

Deepin's store is fast and polished and contain the main software, but and the UbuntuDDE


   Conclussions

Deepin is the most used of both and it's the original one, but many users are trying the UbuntuDDE (which is beta for now) because the need of using recent versions, also the 4 workspaces on Deepin is another limitation for some Linux users. Probably Deepin v20 will overcome the limitations but the main decision is between Debian as base system or ubuntu, and for more users the trend in workstations is ubuntu.


   Gallery


Related articles


  1. Pentest Environment
  2. Pentest With Kali Linux
  3. Hacking Typer
  4. Pentest Nmap
  5. Hacking With Python
  6. Pentest Cheat Sheet
  7. Pentest Questions
  8. Hacking Online Games
  9. Hacking Device

۱۳۹۹ خرداد ۲۲, پنجشنبه

TYPES OF HACKER

7 Types of hacker 

1-Script Kiddies-They are  just download overused software & watch youtube video on how to use it. Script kiddies don't care about hacking.

2-White Hat-They are the good guys of the hacker world. They also known as Ethical Hacker.

3-Black Hat-They finds bank or other companies with weak security and steal money or credit card information. They also known as cracker. They are dangerous because they are illegal to gain unauthorized access.

4-Gray Hat-They don't steal money or information sometimes they deface a website or they don't help people for good.

5-Green Hat-These are the hacker "noobz" but unlike Script Kiddies.They care about Hacking  and strive to become full-blown hacker.

6-Red Hat-These are the vigilantes of the hacker world. They are like White Hats in that they halt Black Hats but these folks are downright SCARY to those who have ever tried so much as penetrest.

7-Blue Hat-If a Script Kiddy took revenge he/she might become a Blue Hat.Most Blue Hats are noobz.They have no desire to learn.

Read more


CEH: Gathering Host And Network Information | Scanning

Scanning

It is important that the information-gathering stage be as complete as possible to identify the best location and targets to scan. After the completion of  footprinting and information gathering methodologies, scanning is performed.
During scanning, the hacker has vision to get information about network an hosts which are connected to that network that can help hackers to determine which type of exploit to use in hacking a system precisely. Information such as an IP addresses, operating system, services, and installed applications.

Scanning is the methodology used to detect the system that are alive and respond on the network or not. Ethical hackers use these type of scanning to identify the IP address of target system. Scanning is also used to determine the availability of the system whether it is connected to the network or not.

Types Of Scanning 

Network ScanningIdentifies IP addresses on a given network or subnet
Port ScanningDetermines open, close, filtered and unfiltered ports and services
Vulnerability ScannerDetect the vulnerability on the target system

Port Scanning ​

Port scanning is the process of identifying open and available TCP/IP ports on a system. Port-scanning tools enable a hacker to learn about the services available on a given system. Each service or application on a machine is associated with a well-known port number. Port Numbers are divided into three ranges:
  • Well-Known Ports: 0-1023
  • Registered Ports: 1024-49151
  • Dynamic Ports: 49152-6553

Network Scanning

Network scanning is performed for the detection of active hosts on a network either you wanna attack them or as a network administrator. Network-scanning tools attempt to identify all the live or responding hosts on the network and their corresponding IP addresses. Hosts are identified by their individual IP addresses.

Vulnerability Scanning

This methodology is used to detect vulnerabilities of computer systems on a network. A vulnerability scanner typically identifies the operating system and version number, including applications that are installed. After that the scanner will try to detect vulnerabilities and weakness in the operating system. During the later attack phase, a hacker can exploit those weaknesses in order to gain access to the system. Moreover, the vulnerability scanner can be detected as well, because the scanner must interact over the network with target machine.

The CEH Scanning Methodology

As a CEH, you should understand the methodology about scanning presented in the figure below. Because this is the actual need of hackers to perform further attacks after the information about network and hosts which are connected to the network. It detects the vulnerabilities in the system bu which hackers can be accessible to that system by exploitation of that vulnerabilities.


More info
  1. Pentest Vs Ethical Hacking
  2. Pentest Checklist
  3. Hacking Browser
  4. Pentesting Tools
  5. Pentest +
  6. Hacker Videos
  7. Hacker Code
  8. Pentest Environment
  9. Pentestmonkey Cheat Sheet
  10. Pentest Tools Framework
  11. What Hacking Is
  12. Pentest Plus
  13. Pentest Tools Github
  14. Hacking Images
  15. Pentest Linux
  16. Hacking Gif

OWASP-ZSC: A Shellcode/Obfuscate Customized Code Generating Tool


About OWASP-ZSC
   OWASP ZSC is open source software written in python which lets you generate customized shellcodes and convert scripts to an obfuscated script. This software can be run on Windows/Linux/OSX with Python 2 or 3.

   What is shellcode?: Shellcode is a small codes in Assembly language which could be used as the payload in software exploitation. Other usages are in malwares, bypassing antiviruses, obfuscated codes...

   You can read more about OWASP-ZSC in these link:
Why use OWASP-ZSC?
   Another good reason for obfuscating files or generating shellcode with OWASP-ZSC is that it can be used during your pen-testing. Malicious hackers use these techniques to bypass anti-virus and load malicious files in systems they have hacked using customized shellcode generators. Anti-virus work with signatures in order to identify harmful files. When using very well known encoders such as msfvenom, files generated by this program might be already flagged by Anti-virus programs.

   Our purpose is not to provide a way to bypass anti-virus with malicious intentions, instead, we want to provide pen-testers a way to challenge the security provided by Anti-virus programs and Intrusion Detection systems during a pen test.In this way, they can verify the security just as a black-hat will do.

   According to other shellcode generators same as Metasploit tools and etc, OWASP-ZSC  using new encodes and methods which antiviruses won't detect. OWASP-ZSC encoders are able to generate shell codes with random encodes and that allows you to generate thousands of new dynamic shellcodes with the same job in just a second, that means, you will not get the same code if you use random encodes with same commands, And that make OWASP-ZSC one of the best! During the Google Summer of Code we are working on to generate Windows Shellcode and new obfuscation methods. We are working on the next version that will allow you to generate OSX.

OWASP-ZSC Installation:
   You must install Metasploit and Python 2 or 3 first:
  • For Debian-based distro users: sudo apt install python2 python3 metasploit-framework
  • For Arch Linux based distro users: sudo pacman -S python2 python3 metasploit
  • For Windows users: Download Python and Metasploit here.
   And then, enter these command (If you're Windows user, don't enter sudo):
DISCLAIMER: THIS SOFTWARE WAS CREATED TO CHALLENGE ANTIVIRUS TECHNOLOGY, RESEARCH NEW ENCRYPTION METHODS, AND PROTECT SENSITIVE OPEN SOURCE FILES WHICH INCLUDE IMPORTANT DATA. CONTRIBUTORS AND OWASP FOUNDATION WILL NOT BE RESPONSIBLE FOR ANY ILLEGAL USAGE.

An example of OWASP-ZSC

Related posts


How To Repair A Crashed SD Card And Protect Your Data

One of the many reasons users prefer Android devices is the ability to expand the amount of available storage space using the MicroSD Card. Since we have the ability add up to 256GB of external storage to Android devices today, you're bound to choke up when the SD card crashes without any tell-tale signs.
If you're experiencing issues on how to repair a crashed SD card on your Android device, there are certain fixes you can try out. Since there's not a singular solution to SD Card issues, we've created a guide to help you detect the issue with your external storage and mentioned multiple solutions to get your SD card working and even retrieve your stored data along with it.


Before you start

Don't format the card if you want to retain any of the photos on it. You can follow the tips in our separate article on how to format a write-protected SD card after you've tried to recover any files that are on your card.

Now, try and find a different card reader. If you've inserted an SD card into your laptop or PC's built-in slot and nothing happens, try using a different computer or a USB card reader.
Sometimes it's the reader at fault – not the card. You can buy a USB SD card reader online for just a couple of pounds which will accept both microSD and standard SD cards.

Steps to Repair a Crashed SD Card and Protect your Data:

Step 1 – Physically clean the SD Card

Despite being durable and built to last, SD cards are prone to crashing sometimes due to physical damage. Since you carry your phone around everywhere, some dirt and dust are bound to fill up in the cracks, that can make SD card stop working from time to time.
The first thing you can try to do on how to repair a crashed SD card is physically scrub and clean it.
  • Remove the MicroSD card from your Android device and place it on a clean surface. Make sure that you turn off your phone before pulling out the SD card for safety.
  • Flip the MicroSD card and using a white eraser, gently scrub the gold contact pins of the SD card to get rid of any residual dirt or grime.
  • If you have an alcohol-based cleaning solution or even nail polish remover around, dab it on to the connector pins using a Q-tip and gently rub it.
Once the SD card has dried out, you can plug it back into your Android device and turn it on to see if the solution has worked.


Step 2 – Format the SD Card

If your SD card is being detected by the Android device but you're having trouble accessing the saved files, there's a good chance that the files are corrupt. This could either be due to a particular broken file in the saved storage, or a virus that is causing the issue.
Either way, the only option there is left for you to try out is make the SD card reusable for formatting it.
  • From the home screen of your Android device, head over to the Settings app and then scroll down to find the Storage
  • In the Storage tab, you'll be able to find the Erase SD Card option, so go ahead and select it.
  • Confirm your action to delete all of the files and folders stored on your SD card and this should effectively solve the issue.

Step 3 – Check the SD card compatibility

If you are trying to figure out how to repair a crashed SD card on an older Android device, you might just need to look at the details more carefully. If your SD card fails to be recognized on the mobile device but works with your computer, the problem could be related to compatibility.
  • If the MicroSD card that you are trying to use with your older phone is SDXC version (built for higher transfer speeds), it will not be recognized.
  • Look up the maximum capacity of expandable storage that is supported by your device, since they can vary from starting at 64GB to all the way up to 256GB.

Step 4 – Diagnose the SD card using a PC

If a simple format did not help you solve the SD card problem, you might need a more technical analysis of the issue. To do so, you can plug in your SD card into a computer and use the diagnostic tools to find out the pertaining errors and effectively fix them.
  • Connect your Android mobile device to a computer using a USB cable.
  • Make sure that you connect Android as MSC (Mass storage mode) and not MTP (Media transfer mode). You can do this using the notification menu once you connect the phone to your computer.
  • Launch the Windows Explorer and right click on the SD card driver you see on the screen. In the options menu, choose Properties – Tools – Error Checking and wait for the entire process to complete.
  • The computer will try to update the software for your SD card and fix any errors that are causing it to crash.

Step 5 – Use chkdsk to fix/repair a corrupted SD card without data loss

The "chkdsk" command is your first choice for damaged SD card repair. Requiring no format, it allows you to fix or repair a corrupted SD card and regain access to all your important files on the device. Let's see how it works. (I'm using Windows 7 for this demonstration)
1. Plug in your SD card to your computer with a card reader.
2. Go to the start menu, type in "cmd" in a search bar, hit enter and then you can see something named "cmd. exe" in a list of programs.
3. Right-click "cmd. exe" and then you will get the following command windows that allow you to fix your corrupted SD card without formatting.
4. Type in "chkdsk /X /f sd card letter:" or "chkdsk sd card letter: /f ", for example,"chkdsk /X /f G:" or "chkdsk h: /f".
After finishing all the steps, Windows will have checked and fixed the file system of the SD card. It usually takes several minutes. After that, if you see "Windows has made corrections to the file system" in the command window, then congratulations! The damaged SD card is successfully fixed and you can see your data again. If not, you should try a third-party data recovery software to retrieve your files from the damaged SD card and repair it by formatting.
Once the process has been completed, you can go ahead and pop the SD card back into your Android device and see if the issue has been resolved.

Step 6 : Use EaseUS Data Recovery Wizard to recover data from damaged SD card

1. Connect the corrupted SD card to your PC, launch EaseUS's data recovery software, select the card and click "Scan".
2. A quick scan will first start to search all the lost and existing data on the SD card. And after that, a deep scan will automatically launch in order to find more files.
3. After the scan, choose those files you want to recover and click the "Recover" button to retrieve them back.

Final Words :

So finally through this article, you have got to know about the method by which the SD card could be repaired and hence the data in it could be saved for the further access. We have tried to present the method in easy to grab manner and we believe that you could possibly get to know about it easily. Hope that you would have liked the information in this post, if it is so then please share it with others. Also, do not forget to share the post with others, let most of the people know about the method. Share your comments about the post through using the comment box below. At last never the fewer thanks for reading this post!
More info
  1. Pentest Cheat Sheet
  2. Pentester Academy
  3. Pentest Vs Ceh
  4. Pentest Open Source
  5. Hacker Software
  6. Pentest News
  7. Pentest Cheat Sheet
  8. Pentest Framework
  9. Pentest Reporting Tool
  10. Hacking Games Online
  11. Pentest Framework
  12. Hacking Ethics
  13. Pentest Dns Server

۱۳۹۹ خرداد ۲۱, چهارشنبه

Sslmerge - Tool To Help You Build A Valid SSL Certificate Chain From The Root Certificate To The End-User Certificate


Is an open source tool to help you build a valid SSL certificate chain from the root certificate to the end-user certificate. Also can help you fix the incomplete certificate chain and download all missing CA certificates.

How To Use
It's simple:
# Clone this repository
git clone https://github.com/trimstray/sslmerge

# Go into the repository
cd sslmerge

# Install
./setup.sh install

# Run the app
sslmerge -i /data/certs -o /data/certs/chain.crt
  • symlink to bin/sslmerge is placed in /usr/local/bin
  • man page is placed in /usr/local/man/man8

Parameters
Provides the following options:
  Usage:
sslmerge <option|long-option>

Examples:
sslmerge --in Root.crt --in Intermediate1.crt --in Server.crt --out bundle_chain_certs.crt
sslmerge --in /tmp/certs --out bundle_chain_certs.crt --with-root
sslmerge -i Server.crt -o bundle_chain_certs.crt

Options:
--help show this message
--debug displays information on the screen (debug mode)
-i, --in add certificates to merge (certificate file, multiple files or directory with ssl certificates)
-o, --out saves the result (chain) to file
--with-root add root certificate to the certificate chain

How it works
Let's start with ssllabs certificate chain. They are delivered together with the sslmerge and can be found in the example/ssllabs.com directory which additionally contains the all directory (containing all the certificates needed to assemble the chain) and the server_certificate directory (containing only the server certificate).
The correct chain for the ssllabs.com domain (the result of the openssl command):
Certificate chain
0 s:/C=US/ST=California/L=Redwood City/O=Qualys, Inc./CN=ssllabs.com
i:/C=US/O=Entrust, Inc./OU=See www.entrust.net/legal-terms/OU=(c) 2012 Entrust, Inc. - for authorized use only/CN=Entrust Certification Authority - L1K
1 s:/C=US/O=Entrust, Inc./OU=See www.entrust.net/legal-terms/OU=(c) 2012 Entrust, Inc. - for authorized use only/CN=Entrust Certification Authority - L1K
i:/C=US/O=Entrust, Inc./OU=See www.entrust.net/legal-terms/OU=(c) 2009 Entrust, Inc. - for authorized use only/CN=Entrust Root Certification Authority - G2
2 s:/C=US/O=Entrust, Inc./OU=See www.entrust.net/legal-terms/OU=(c) 2009 Entrust, Inc. - for authorized use only/CN=Entrust Root Certification Authority - G2
i:/C=US/O=Entrust, Inc./OU=www.entrust.net/CPS is incorporated by reference/OU=(c) 2006 Entrust, Inc./CN=Entrust Root Certification Authority
The above code presents a full chain consisting of:
  • Identity Certificate (Server Certificate)
    issued for ssllabs.com by Entrust Certification Authority - L1K
  • Intermediate Certificate
    issued for Entrust Certification Authority - L1K by Entrust Root Certification Authority - G2
  • Intermediate Certificate
    issued for Entrust Root Certification Authority - G2 by Entrust Root Certification Authority
  • Root Certificate (Self-Signed Certificate)
    issued for Entrust Root Certification Authority by Entrust Root Certification Authority

Scenario 1
In this scenario, we will chain all delivered certificates. Example of running the tool:

Scenario 2
In this scenario, we only use the server certificate and use it to retrieve the remaining required certificates. Then, as above, we will combine all the provided certificates. Example of running the tool:

Certificate chain
In order to create a valid chain, you must provide the tool with all the necessary certificates. It will be:
  • Server Certificate
  • Intermediate CAs and Root CAs
This is very important because without it you will not be able to determine the beginning and end of the chain.
However, if you look inside the generated chain after generating with sslmerge, you will not find the root certificate there. Why?
Because self-signed root certificates need not/should not be included in web server configuration. They serve no purpose (clients will always ignore them) and they incur a slight performance (latency) penalty because they increase the size of the SSL handshake.
If you want to add a root certificate to the certificate chain, call the utility with the --with-root parameter.

Certification Paths
Sslmerge allows use of two certification paths:

Output comments
When generating the chain of certificates, sslmerge displays comments with information about certificates, including any errors.
Here is a list of all possibilities:

not found identity (end-user, server) certificate
The message is displayed in the absence of a server certificate that is the beginning of the chain. This is a unique case because in this situation the sslmerge ends its operation displaying only this information. The server certificate is the only certificate required to correctly create a chain. Without this certificate, the correct chain will not be created.

found correct identity (end-user, server) certificate
The reverse situation here - message displayed when a valid server certificate is found.

not found first intermediate certificate
This message appears when the first of the two intermediate certificates is not found. This information does not explicitly specify the absence of a second intermediate certificate and on the other hand it allows to determine whether the intermediate certificate to which the server certificate was signed exists. Additionally, it can be displayed if the second intermediate certificate has been delivered.

not found second intermediate certificate
Similar to the above, however, it concerns the second intermediate certificate. However, it is possible to create the chain correctly using the second certification path, e.g. using the first intermediate certificate and replacing the second with the main certificate.

one or more intermediate certificate not found
This message means that one or all of the required intermediate certificates are missing and displayed in the absence of the root certificate.

found 'n' correct intermediate certificate(s)
This message indicates the number of valid intermediate certificates.

not found correct root certificate
The lack of the root certificate is treated as a warning. Of course, when configuring certificates on the server side, it is not recommended to attach a root certificate, but if you create it with the sslmerge, it treats the chain as incomplete displaying information about the incorrect creation of the chain.

an empty CN field was found in one of the certificates
This message does not inform about the error and about the lack of the CN field what can happen with some certificates (look at example/google.com). Common Name field identifies the host name associated with the certificate. There is no requirement in RFC3280 for an Issuer DN to have a CN. Most CAs do include a CN in the Issuer DN, but some don't, such as this Equifax CA.

Requirements
Sslmerge uses external utilities to be installed before running:

Other

Contributing
See this.

Project architecture
See this.


More articles

How To Hack Any Game On Your Android Smartphone

How To Hack Any Game On Android 2018

How To Hack Any Game On Your Android Smartphone

By hacking android game you can unlock all the levels, use any resource according to your wish and lots more. Proceed with the method shown below to hack any game on your Android. But sometimes while playing our favorite game we get short on our resources that are needed to play that game, like power, weapons or lives etc. That consequence really becomes bothersome, so to overcome this we are here with the trick How To Hack Any Game On Android.

Today millions of character are using the android phone. Now an Android device enhances significant part of our life. Everyone loves to play games on their android device. There are lots of cool games that are today available on your Android device in Google Play Store.


How To Hack Any Game On Android 2018

Hack Any Game On Android
How To Hack Any Game On Your Android Smartphone
Now it's time to hack into the game and use any resources that you want to play at any level of the game. The method is really working and will let you alter the game according to your wish. Just proceed with simple steps below.

Steps To Hack Any Game On Android

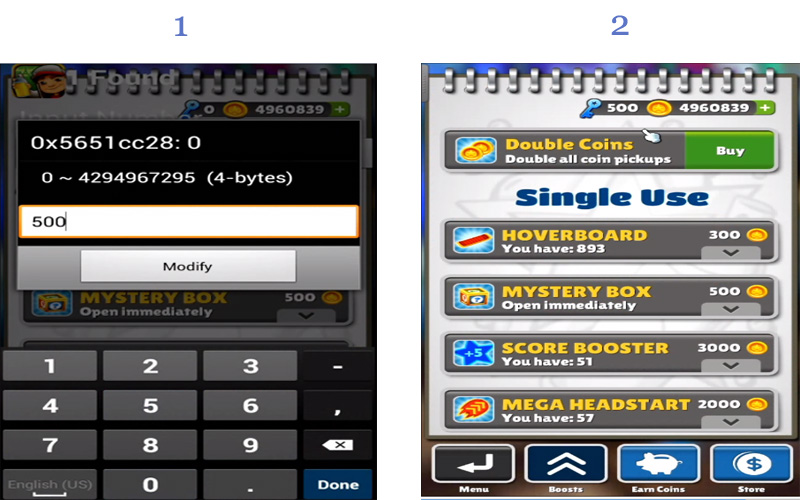
Step 1. First of all after rooting your android device open the GameCIH App. It will ask you for superuser access, grant it.(This will only come if you have properly rooted your android device. Now on the home screen of this app, you will see Hot-Key option, select any of them which you feel more convenient while using in your android.
Hack Any Game On Android
How To Hack Any Game On Your Android Smartphone
Step 2. Now open the game that you want to hack into your android device. Now pause the game and access the hotkeys displaying there, select any value that you want to edit in your game. Like any of text value like keys of subway surfer game.
Hack Any Game On Android.2
How To Hack Any Game On Your Android Smartphone
Step 3. Enter your desired value in the text field box appeared there and click on done. Now you will see default value will get replaced with your value. Similarly, you can alter any values in any of the game according to your wish.
Hack Any Game On Android.3
How To Hack Any Game On Your Android Smartphone
That's it game hacking is done, Now you can access any resources using this hack.
So above is all about Hack Any Game On Android. With the help of this trick, you can alter any coins, lives, money, weapons power and lots more in any of your favorite android game and can enjoy the unlimited game resources according to your wish.

Using Game Guardian

Game Guardian Apk is one of the best apps which you can have on your Android smartphone. With the help of this app, you can easily get unlimited coins, gems and can perform all other hacks. However, Game Guardian Apk needs a rooted Android smartphone to work. Here's a simple guide that will help you.
Step 1. First of all, you need to download the latest version of Game Guardian on your Android smartphone from the given download link above or below.
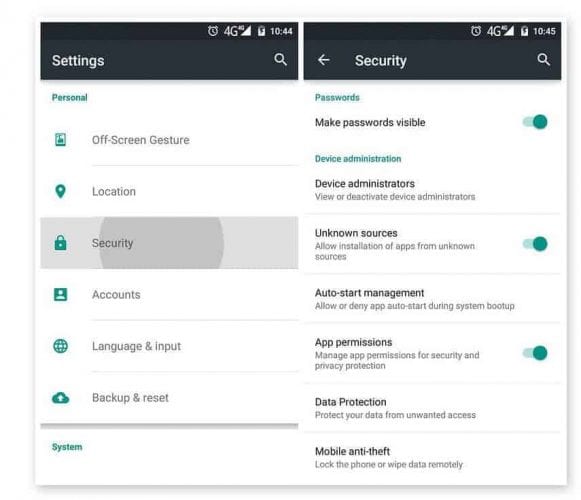
Step 2. After downloading on your smartphone, you need to enable the Unknown Source on your device. For that, you need to visit Settings > Security > Unknown Sources
Using Game Guardian
Using Game Guardian
Step 3. Now install the app and then press the home button to minimize the app. Now open any game that you want to hack. You will see an overlay of Game Guardian App icon. Tap on it.
Step 4. Now you need to tap on the Search Button and set the value. If you don't know the values, then simply set it to auto.
Using Game Guardian
Using Game Guardian
Step 5. You need to search for the value which you want to hack like money, gem, health, score etc. You can change all those values. Suppose, if you need to decrease the number of values, you need to scan again for the new value.
Using Game Guardian
Using Game Guardian
Step 6. Finally, you need to select all the values and then change it to infinite numbers like '9999999' or whatever you want.
Using Game Guardian
Using Game Guardian
That's it, you are done! This is how you can use Game Guardian Apk to hack games on your Android smartphone.
With this, you can play a game at any levels without any shortage of any resource that can interrupt your gameplay. Hope you like this coolest android game hack. Don't forget to share it with others too.

Related links


  1. Hacking Books
  2. Pentest Enumeration
  3. Pentest As A Service
  4. Pentest Blog
  5. Pentest Tools Free
  6. Hacker Computer
  7. Pentest Software
  8. Hacking Images
  9. Hacking Forums
  10. Hacker On Computer
  11. Pentest Ios
  12. Pentest Companies
  13. Pentest Dns
  14. Pentest Ubuntu
  15. Pentest Reporting Tool
  16. Hackerrank Sql
  17. Hacking Gif
  18. Pentest Documentation